Finished nixie weather station
I decided to make people Christmas presents last year, and thought I’d make my Dad a weather station. That’s the kind of thing parents like. I wanted to make something a bit nicer looking than an ugly circuit board so had the idea of attaching the wires to a piece of wood. In the end I had to make it in about a day, just before Christmas, and so it didn’t end up as neat as I would have liked. However, I think the result is still pretty nice/interesting. Something I will definitely try again, perhaps with more time and planning.
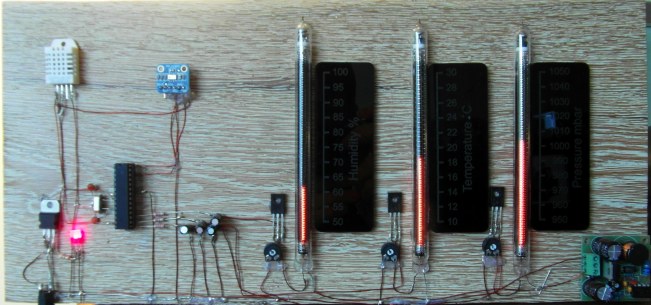
The heart of the actual weather station is an Atmega328 with an arduino uno bootloader. For the sensing I use an MPL115A2 pressure and temperature sensor, conveniently broken out by Adafruit. For the humidity I use an DHT22 temperature and humidity sensor. Though since I already have a temp sensor I ignore this one.
It is pretty straight forward to get the arduino and sensors talking and displaying the humidity, temperature and pressure on screen. To display it on the weather station I decided on 3 nixie IN-9 bargraphs, as previously used on my clock project. These need a 140v supply which I bought as a small board (visible on the bottom right). To control the height of the plasma the current through each tube needs to be controlled. To achieve this I map the humidity, temp and pressure values to 3 PWM outputs and pass through a low pass filter, with a time constant of about 1 second. This gives a pretty good DC voltage. This is then fed into the base of a high voltage transistor. This then controls the current through the tube. Much simpler than it might sound. Check out my clock instructable for how to control the nixie tubes with an arduino.
So, why is this all 10 months late. Well I did all of the above in about a day. I wired the whole thing up with copper wire and glued onto a wood backing. An old piece of laminate flooring! However, I never actually got round to making scales for the different tubes. As any young scientist knows, without labelling the axes it means nothing! The problem was I could never think of a nice way of doing it, until now. Playing around at the Hackspace I decided to laser cut them. I tried a few materials, wood being the obvious choice, but opted in the end for black acrylic. After a little tweaking, I cut the scales and stuck them on. Now it really is finished and looking pretty good. An instructable may follow…


Hallo
Bin Nixie-Fan
Gibt es diese Nixie-Wetterstation als Bausatz zu kaufen?
Gruss Thomas aus der Schweiz
LikeLike
Hi, no sorry I don’t offer it as a kit. However, it is very similar to my Nixie Clock project in its operation. There is a instructable to how I made this: http://www.instructables.com/id/Nixie-bargraph-clock/ For the weather station I used a sensor from adafruit for the pressure sensor and DHT22 for temperature and humidity. I read these with an atmega328 with the arduino bootloader, then controlled the nixie tubes with the PWM outputs, transistors and HV supply the same way I did for the clock. It’s actually quite simple to get working and looks great!
LikeLike