10W RGB LED bed side light (better late than never)
I wanted to make a Christmas present for my girlfriend this year so I decided to make a RGB bedside light. The LEDs themselves are cheap enough of eBay as are constant current drivers.
The LED I chose was a 10W RGB, so 3W red, 3W green and 3W blue. To drive this rather over spec’d lamp I decided on the PT4115 LED driver costing a massive £0.99 for 10. These just require a resistors, inductor, capacitor and diode. With a simple circuit diagram for 3W LEDs on page 11 of the spec sheet. The brightness can be controlled by PWM from a microcontroller directly to the IC. Whipped up a board in Eagle and bought 10 PCBs from China.
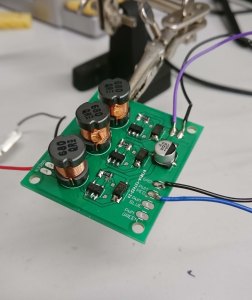
The PT4115 is an SOT89 so a little fiddle to solder with the massive tips at the Hackspace but manageable. You can see I have put three on one board, one for each colour.
Now it was simply a case of soldering the board to the LED and plugging in my arduino.
And yes it was. However, what I was surprised at (but shouldn’t have been) is how hot these get. Being used to little LEDs I don’t think of them as giving off any heat. However, whilst they may be extremely efficient, say 80%, then that’s still 2W of energy being turned into heat. It was about this time the first LED stopped working. Time to find a heatsink.
First heat sink found in a box of bits…
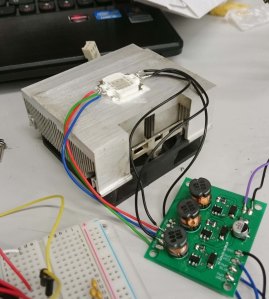
This was pretty effective and prevented the LED overheating. However, after about 10-15 min it became too hot to touch. Next heatsink.
This one even had a fan on it! This beast did nicely.
For permanently mounting the light decided to laser cut a ply wood box, the top would hold the heatsink and beneath would be the drivers and a controller. To control the colour of the lamp I opted to use two pots. One pot would control the overall brightness of the lamp and the second would control the colour. I used an Adafruit Trinket I had spare. In fact the first microcontroller I ever bought. I never liked it much though as I could never get it work on Windows only on Linux, which I don’t often use. So a good project to get rid of it in. Fortunately it has just the right number of pins, two analogue inputs and three PWMs. It also has a power regulator so I can take power directly from the 12V supply.
Here’s a pic of the laser cut box.
There are two lines on the right face, the top is a slot to hold a support across the box to hold the heat sink. The second lower slot is a vent to allow air to circulate from the bottom, up through the heat sink and out the top slots.
To act as a diffuser/lamp shade I simply used a sheet of nice paper. Folded it into a rectangle and placed it on top. It works really effectively. Here’s a pic.


please give schematic for PT4115 IC
LikeLike
You can find the schematic for the circuit in the PT4115 data sheet, I just copied it straight from there.
LikeLike
A capacitor ,inductor , shocttky diode and resistor is enough to drive pt4115 ?
LikeLike